

Table of Contents
If you’re wondering about the virtual desktop best codec for Quest 2, you’re not alone! Choosing the right codec can make your VR experience smoother, clearer, and more immersive. The Quest 2 is a powerful headset, but using the right settings like the best codec can take things to the next level.
In this blog, we’ll talk about why codecs matter for Virtual Desktop. We’ll also explore which codec works best for Quest 2 users. Whether you’re playing games, watching movies, or exploring virtual worlds, understanding the virtual desktop best codec for Quest 2 will help you enjoy the ultimate VR experience.
What Is a Codec? Understanding the Basics for Virtual Desktop
A codec is a tool that helps compress and decompress video and audio files. It allows you to stream content smoothly by making large files smaller, without losing too much quality. For Virtual Desktop, using the right codec can greatly improve your experience with Quest 2, making VR gameplay clearer and faster.
When you connect your Quest 2 to your PC using Virtual Desktop, the codec decides how well the video is transferred to your headset. A good codec helps maintain high-quality images and reduces lag during gameplay. This is important because any delay in VR can affect how immersive the experience feels.
Why Choosing the Best Codec Matters for Quest 2 Users
For Quest 2 users, selecting the best codec can have a big impact on your VR experience. If you want smooth, high-quality visuals and fewer distractions while using Virtual Desktop, it is crucial to choose a codec that works best for your setup.
Without the right codec, you may experience lag, poor graphics, or connection drops. This can lead to a frustrating VR experience, especially when you’re playing fast-paced games. That’s why it’s important to consider the virtual desktop best codec for Quest 2, which can optimize your connection and visual quality.
How to Find the Virtual Desktop Best Codec for Quest
To find the virtual desktop best codec for Quest 2, start by testing different codecs and settings.
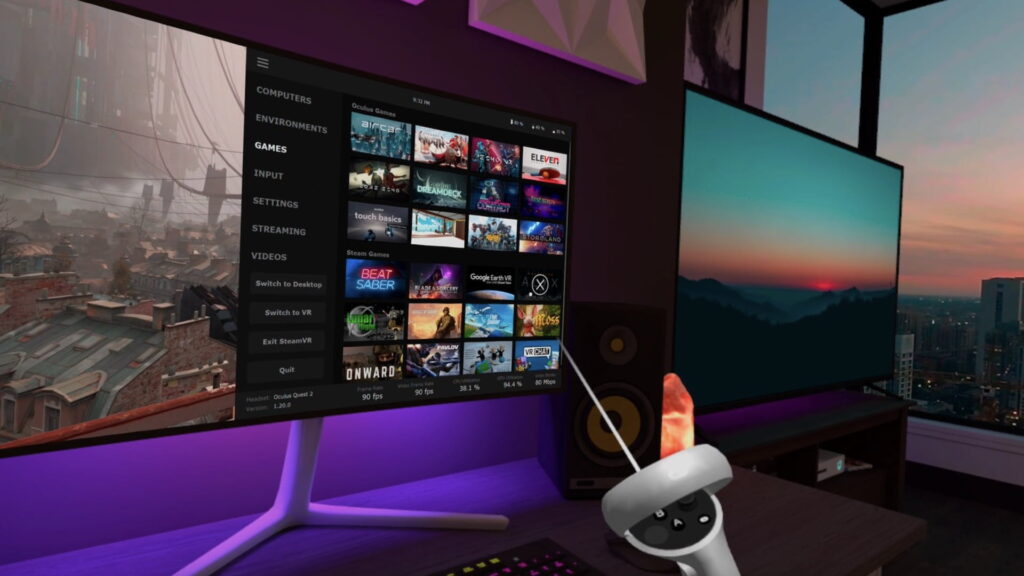
- Step 1: Open Virtual Desktop on your Quest 2 and connect it to your PC.
- Step 2: Go to the settings menu in Virtual Desktop and select “Streamer Codec.”
- Step 3: Try switching between available codecs like H.264 and AVI-10.
- Step 4: Test different bandwidth and frame rate settings to optimize performance.
These steps will help you figure out which codec provides the best performance for your Quest 2. Remember, the best codec may vary depending on your PC’s specifications, so don’t be afraid to experiment with different settings.
Best Codec Settings for Quest 2
- AVI-10: Ideal for high-end systems, offering clearer visuals.
- H.264: A good option if your system has lower specs.
Step-by-Step Guide to Setting Up the Best Codec on Quest 2
Setting up the best codec on your Quest 2 involves a few simple steps. First, make sure your PC and Quest 2 are both ready for Virtual Desktop. If you’re unsure which codec is best for your Quest 2, the H.264 codec is often a safe choice for most users.
- Step 1: Open Virtual Desktop on your Quest 2 and connect it to your PC.
- Step 2: Go to the Virtual Desktop app and open the settings.
- Step 3: Select the “Streamer Codec” option and choose either H.264 or AVI-10 based on your system.
- Step 4: Adjust the settings for resolution, bandwidth, and frame rate to get the best performance.
By following these steps, you can easily adjust the virtual desktop best codec for Quest 2 and improve your VR experience. Testing out different codecs will allow you to find the perfect combination of performance and visual quality.
Does Your GPU Impact Codec Performance on Quest 2

Yes, your GPU can affect how well the codec works on Virtual Desktop with your Quest 2. A powerful GPU, such as an RTX 3000 or RTX 4000 series, can handle more demanding codecs like AVI-10.
- RTX 4000 series: Handles higher-quality codecs like AVI-10 with ease.
- RTX 3000 series: Good for H.264 codec with decent performance.
- Older GPUs: Best to stick with H.264 for smooth experience.
Finding the virtual desktop best codec for Quest 2 means matching the codec to your GPU’s strength to get the best quality and smoothest VR experience.
Conclusion
In conclusion, finding the virtual desktop best codec for Quest 2 is important for a smooth and enjoyable VR experience. By selecting the right codec, you can improve the clarity of your visuals, reduce lag, and make your gameplay feel more realistic. Remember to try different settings to see which works best with your system.
The key is to experiment with the settings to find the perfect balance of quality and performance. Don’t forget that the best codec for you depends on your PC’s hardware and what you want to get out of your VR experience.
FAQs
Q: What is the best codec for Virtual Desktop on Quest 2?
A: The best codec for most Quest 2 users is AVI-10, as it provides clear visuals and good performance.
Q: Can I use H.264 for Virtual Desktop on Quest 2?
A: Yes, H.264 works well for many users, especially those with older PCs or GPUs.
Q: How do I change the codec in Virtual Desktop on Quest 2?
A: Go to the Virtual Desktop settings, find the “Streamer Codec” option, and select either AVI-10 or H.264.
